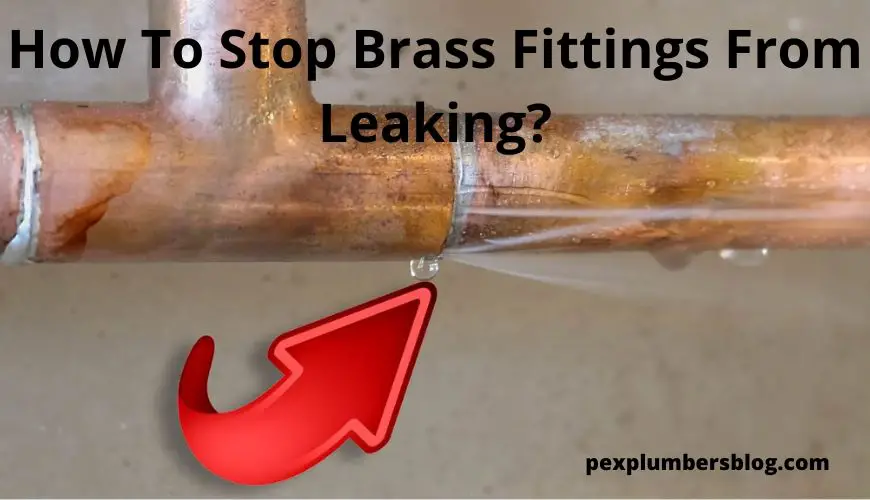
We can’t brush our teeth nor do the dishes properly if the fitting of the sink is always leaking, can we? How To Stop Brass Fittings From Leaking?

A leaking pipe fitting, whether in the kitchen or the bathroom and cause us great trouble.
Wet clothes, skyrocketing utility bills, and most importantly, the consequences of the event of water touching electricity!
These are the reasons why it is crucial to ensure that every fitting around the house is in tip-top condition.
However, you can’t tell when a pipe fitting starts leaking. If you notice it, then how are you going to fix it?
Most pipe compression fittings used in homes and other places are made of brass.
If yours are also made of the same material, you can follow this guide on how to stop brass compression fittings from leaking.
Why Do Brass Fittings Leak?
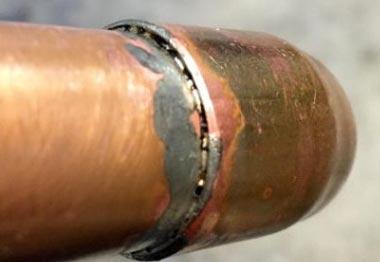
Brass compression fittings are comprised of a copper ring, valve body, and a nut.
The copper ring becomes compressed as the nut is tightened to the valve body, resulting in a sealed joint.
There are many types of brass fittings, with the common ones being elbows, unions, and tees.
The notable reasons why water leakage occurs are poor quality of the brass fitting, corrosion of the copper ring, temperature changes, and loose connection.
Starting from slow drips, the leak can lead to flooding as the brass fitting deteriorates over time.
So, this is something that needs to be taken care of as soon as possible.
While you can fix small leaks using Teflon tape, larger leaks require the replacement of the entire copper ring.
Relevant post >> How Long Does Pex Piping Last
How To Stop Brass Fittings From Leaking- Step by Step Guideline
Regardless of the type of brass fitting, you’ll be able to fix water leaks either by using a Teflon tape or a pipe thread compound.
If none of these methods work, your last resort will be to replace the copper ring with a new one threaded fittings.
A. Using A Teflon Tape
- Disassemble the brass fitting. Take a Teflon tape and tightly wrap that around male pipe 3-5 times in a clockwise direction.
- Keep wrapping until the threads are covered completely. While wrapping, make sure to press the tape against the threads with your thumb in order to remove air bubbles.
- Once the tape is in place, use scissors to cut the rest of the tape off the pipe.
- After cutting the tape, assemble the fitting back into place. Make sure it is tightly screwed.
B. By Using Pipe-Thread Compound
- Disassemble the threaded brass fitting.
- Take a clean damp rag and use it to wipe off any dirt or grime from the male and female threads threaded fittings. After that, dry them with a dry rag.
- Apply a few drops of a good pipe thread compound on the male thread.
- Put the fitting back into place and then wipe off any excess pipe thread pipe joint compound. Make sure the fitting is tightly screwed.
- Do not let the water run until the compound dries completely. Otherwise, it will lose its effectiveness.
C. Using A New Copper Ring
- Turn off the shut off valve located near the pipe to stop the water flow.
- Let the remaining water inside the pipe drain out by turning on the faucet.
- Take a pair of pliers and use it to clasp onto the valve body. Then take a wrench and position it on the nut. Turn it counter-clockwise to remove the nut. Make sure the copper tubing remains unaffected.
- Once you’ve removed the nut, take out the copper tubing. Also, slide the old copper ring off the tubing.
- With the help of pliers, twist the copper ring in forward and backward directions to remove it.
- Take a scouring pad and use it to wipe off dirt and rust from the end of the copper tubing. You can also use an emery cloth if you have one at hand.
- Insert a new copper ring onto the copper tubing. Then apply a pipe joint compound onto the new copper ring and onto the threads of the copper tubing.
- Insert the end of the copper tube into the valve body and then slide the new copper ring up over the joint.
- Screw the compression nut back into the valve body. Clasp the valve body with pliers and then use a wrench to tighten the nut. Make sure not to tighten the nut too much or else the copper tubing may get deformed.
- Turn on the shut off valve and the faucet to check for any leaks.
Final Word
Fixing brass fittings for preventing water leakage is not a difficult task, especially when you know the right way of doing it.
With the right tools, you can fix leaks by yourself instead of calling a plumber every time.
That way, you can save a few dollars from your wallet, as well as gain peace of mind.
By going through our guide on how to stop brass fittings from leaking, hopefully, you have learned about the different methods worth trying.
Since the safety of you and your family comes first, be sure to act fast as soon as you spot any leak!
Also Read:
- Type of Solder For Copper Pipe
- Pick a Right Torch For Soldering
- Soldering Flux For Copper Pipe
- A Quality Product List Of Pipe Insulation
- Choose a Top Quality Air Admittance Valves
- How to Remove Rust From Pipe Threads

Hey! I’m Leanda Bailey. I’m here to explain every plumbing installation and repair you may have in your kitchen or bathroom. Also, I’ll try to find you the best products on the market for your plumbing work.
